Showing posts with label Layout. Show all posts

Monday, 5 February 2018

Darkroom Door Sunshine Stencil Layout


Hi folks!

I scrapped! I saw the new Sunshine Stencil from Darkroom Door and knew it would make the perfect background for a layout:


I also used the Patchwork Butterfly Collage Stamp and a few others to complete the layout: 


There's a set of instructions and supplies list over on the Darkroom Door blog for you to check out.

Thanks for looking - hope your week is a productive one!


Wednesday, 16 September 2015

A layout for Ruby Rock-It

I have a layout to share today, made using one of the new Mini Themes by Ruby Rock-It called Family:


Details and close ups at the Ruby Rock-It blog. Thanks for looking!


Saturday, 15 August 2015

Ruby Rock-It layout


I scrapped! Yep, I know...it has been a while! This is a layout I made using Ruby Rock-It's Heritage range:


It's a photo of my little Rachel, grabbing onto a fence because she didn't want to leave a farm we visited.  Aaaaah...priceless memories!

Pop over to the Ruby Rock-It blog to see some close ups and the full product list.


Friday, 14 August 2015

Classes at Paperific 2015


I'm excited to announce that I will be teaching a couple of classes at Paperific this year.  First up is a layout class:


This will run on Friday at 2:30pm and on Saturday at 12pm.

Each participant will receive a whole KaiserCraft Touch of Gold paper pack and Collectables pack (so there's heaps left over to take home!). We will create some unique embellishments to use on a quick layout, and have a little play with gold foil. It's essential you bring some foam tape, otherwise everything else will be available to share in class (bring your own basic kit if you can to save time).  Bring a 4 x 6 photo (black and white looks fabulous with this range of papers!), or you can add one at home.

The second class is a card class. Here's a little sneak peek:


The card class will run on Saturday at 10:30am.

We'll make four lovely cards using the new Silver Bells pad from KaiserCraft. We'll add silver string, sequins and bling. We'll also have a little play with Pan Pastels and even make a shaker card.

All the information you need can be found on the Paperific website, and bookings can be made on the here.  If you have any questions, please use the contact me form in the sidebar of this blog (over there on the right), or call Little Bits on 03 9798 4122 Mon-Sat 9-4pm.

Hope to see you there!

Wednesday, 3 September 2014

Sketchy Boards Challenge Guest spot


A few weeks ago, my talented friend Ness Henry asked if I'd be interested in a guest spot on a fabulous monthly challenge called Sketchy Boards. A sketch and an image are provided for inspiration, and I was inspired by both.

I was delighted to be asked! Here's my layout:


and here are a couple of close ups:


You can enter this month's challenge and see some awesome inspiration from the design team on the Facebook page.

Thanks for dropping in!

Saturday, 23 August 2014

Using Spellbinders dies to make a stencil


This is a layout I put together using Spellbinders dies, Bazzill cardstock and some Darkroom Door stamps:


I used the Grateful Lattice die to create a stencil, and applied Crackle Texture paste through it.

The full materials list can be found on the Down Under Direct Inspiration blog. Thanks for dropping in!


Saturday, 26 July 2014

Modern Layout

Great balls of fun! These photos were taken on my Hipstamatic app on my iPhone a couple of years ago at the Dandenong Show. The children were inside those inflatable balls in a pool of water. Talk about almost setting off a panic attack - water, confined space, no air.....add fire and a boogey man and I would have run off screaming! The children thoroughly enjoyed it - completely oblivious to my hyperventilating in the corner LOL.

I kept the layout simple and bright, and added little die cuts here and there for interest:


I've had my square Spellbinders dies for ages, and I still use them all the time. Love my basic shapes!

Here's a side view:


The full materials list can be found on the Down Under Direct Inspiration blog.

Thanks for dropping by - have a great weekend!

Wednesday, 4 June 2014

You make me smile layout

The photo on this layout was of a perfectly sunny day in Sydney last year. I wanted the layout to be bright and sunny too:


The dies are Spellbinders of course, and I layered the yellow die cut over the grey to create a drop shadow look. This technique is great for when a little dimension is required, but the layout has to remain flattish because it has to go in an album.
 

The bottom right hand corner has some brickwork (gesso through a stencil) and the gorgeous Spellbinders Bicycle die.

The full materials list can be found on the Down Under Direct Inspiration blog.

Thanks for dropping by! Having you here sure does make me smile :)

Sunday, 27 April 2014

Boo! Baby girl layout.


I used some Lyra watercolour crayons on the white Bazzill cardstock to help extend the background paper onto the centre piece:


I cut a few flowers and pennants with Spellbinders dies, and I got some ink and a brush out to do the lettering.


I had some messy fun putting this layout together! Messy fun is exactly how I'd describe my daughter Elouise too LOL.

The full materials list can be found on the Down Under Direct Inspiration blog.  Thanks for dropping by!

Sunday, 30 March 2014

SpiderJake layout

Aaaaaah memories. I found this photo of my son's 4th birthday party. It was a dress up party, with a face painter and I remember he insisted we refer to him not as Spiderman, but as SpiderJake.

I used a bunch of Spellbinders dies on the layout, over a background of acrylic paint through a stencil. The starburst shapes come from the Blooms Three Die D'Lites set - they're meant for the centre of the flowers but I reckon they're perfect for boy layouts. Here's a close up:


The full materials list can be found on the Down Under Direct Inspiration blog.

Thanks for looking!

Tuesday, 18 February 2014

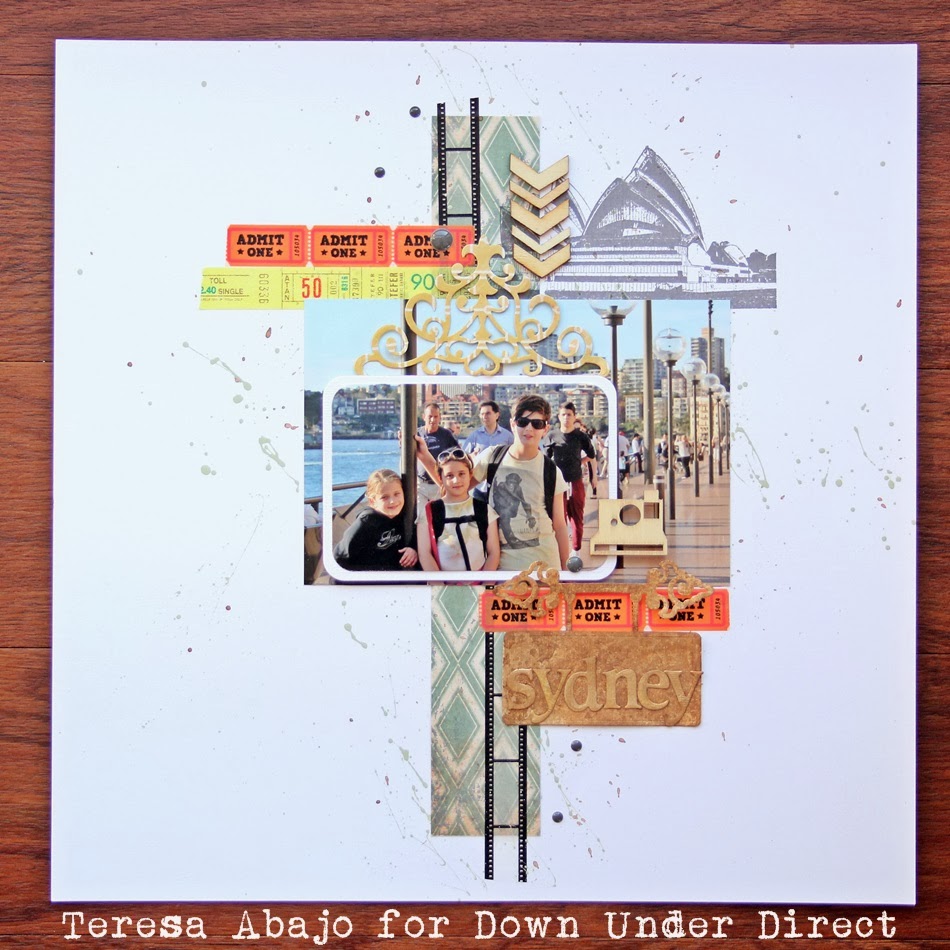
Sydney Layout

About six months ago, we took the kids up to Sydney for a weekend. How nice it was to enjoy some warm weather and sunshine after a long cold Melbourne winter.

This is a layout of a photo I took of the kids around the Opera House:


I used paint spatters, scraps of patterned paper, washi tape, wood veneer shapes, a Darkroom Door stamp and lots of Spellbinder dies.  

Here's a close up of the raised part of the photo. I cut out the focal point and mounted it onto a slightly larger shape cut from white cardstock. This helped make the area stand out without removing it completely from the background.


The full materials list can be found on the Down Under Direct Inspiration blog. Thanks for looking!

Wednesday, 22 January 2014

A sweet layout

A lot of love in this photo:

 
an unusual photo too - a moment in time where they're not telling each other how annoying the other one is, or how much they hate having a sister. I giggle...I just know they'll grow up to be as close as two fingers :)
 
For this layout, I put some white Bazzill cardstock over some black and white patterned paper and went to town with Gelatos and Glimmermist. After deciding where the photo would sit, I went about adding little embellishments and Spellbinders die cuts:
 

...and thread. Oh boy am I going through it at the moment!


The full materials list can be found on the Down Under Direct Inspiration blog.

Thanks for looking!

Thursday, 16 January 2014

Layout with Spellbinders Nested Circles

I have a layout to share for those who are now scrapping their Christmas photos:


Using foam mounting tape I created a bit of a tunnel effect with the Spellbinders circle dies. Here's a close up:


I flicked gesso and navy blue Distress Stain, and then stamped some little stars from the Darkroom Door Christmas Reindeer stamp set.

Full details can be found on the DownUnder Direct Inspiration blog.

Thanks for looking!

Thursday, 24 October 2013

Spellbinders Tapestry die Layout

I have fallen in love with Spellbinders new Tapestry die! It's just beautiful, and I was thrilled to be able to use it on this layout:


I painted some cardstock with acrylic paints to match the colours in the wrought iron fence Elouise is leaning against in the photo. I used the die cut under the photo.

I then cut a stencil with the die and used the same acrylic paints to dab some paint onto the layout. LOVE!

Here's a close up of the stencilling:

 
I had some of the painted cardstock left over, so I cut a butterfly and some letters using the new Font One Lowercase dies: 


The full materials list can be found on the Down Under Direct Inspiration Blog.

Thanks for looking today!

Friday, 20 September 2013

Cup of tea layout

I did a layout based around a wonderful afternoon ritual - an afternoon cup of tea. Because I think one should document all the important things in life:


These Spellbinders dies called Curved Matting Basics were the perfect shape for this geometric design. The quote is from Darkroom Door.

The full materials list can be found on the Down Under Direct Inspiration blog.

Thanks for looking!


Wednesday, 14 August 2013

Like Two Peas layout

People often tell me I made a mini me. My daughter Rachel certainly looks like me a little....she's like a younger, more energetic version of me. It puts a smile on my face when she tells her older brother and younger sister off using words that sometimes come out of my mouth.

Anyway, here's the layout:


I made a stencil from the Spellbinders Grateful Lattice die, and brushed some acrylic paint through it. Over that I added some spatters of Glimmermist, and then assembled the rest of the layout over this.

 
Some black machine stitching here and there helps to tie in the black coats in the photograph. I also tore thin strips of patterned paper to add just a touch of detail without taking up too much of the white space:


Thanks for stopping in today. The full materials list can be found on the DownUnder Direct Inspiration blog.

Monday, 5 August 2013

August 2013 Paperific classes

The classes for the next Paperific show have just been posted on the website. I'll be running two quick classes - one is a Male Cards Class and the other is an arty style layout with colour sprays.

Here's the sneak for the card class:

 
The card class will be a one hour class, and we'll make a last minute Fathers' Day card and a birthday card. We'll create an awesome background, and play with the chalkboard technique.

This is the layout sneak peek:


In the one and a half hour layout class we will create an arty background over which to build our layouts. I've chosen a neutral colour scheme, so it should match with just about any photo. It will be possible to colour match some of the elements if you do bring a colour photo.

I've really kept the price down for these classes - just $15 for the card class and $20 for the layout class. Bookings through Little Bits on 03 9798 4122, and please contact me directly with any questions you may have about my classes (details on the Paperific website).

Looking forward to seeing some of you!