Showing posts with label Copics. Show all posts

Tuesday, 14 March 2017

Paper Rose Sasha Copic Card


This is the sample from the Copics class I ran last month:


The stamp is from an Australian company called Paper Rose. It's called Sasha. The paper is from Kaisercraft, and the Copic markers used for the dress were from the B90 family.

I cut the word from glitter cardstock and added some colour to it with the same Copic markers that I used for the dress:


The pearls and diamantes were also coloured with Copic markers - so that EVERYTHING matches :)

Thanks for stopping by!


Wednesday, 30 July 2014

Strawberry Lady

Hello crafty friends! I have a card to share today that I made with one of Darkroom Door's new Line Art stamps. She's called Strawberry Lady (for the obvious reasons LOL):


I coloured her with my Copic markers, cut her out and mounted her onto some woodgrain patterned paper by KaiserCraft. The words come from the  Just My Style stamp set, and with the help of a stamp positioner (and several magic words I just can't repeat here), I made the sentiment into a straight line. I reckon anyone brave enough to wear strawberries in her hair deserves to be called remarkable!

The background was stamped with another new release - the Splatters Texture stamp. Love that you can stamp in repeatedly to get a big background and yet you can't see any overlapping lines :)

Thanks for looking!

Wednesday, 16 July 2014

Darkroom Door's Line Art Leafy Lady


Darkroom Door's new range of Line Art stamps feature amazing images of ladies with some very creative hair!

Here's what I made with Leafy Lady, the lady with the bird nest hair:


I coloured the image with Copic markers, and then created a background resembling bark from scraps of kraft paper. I added some plastic ivy leaves and a KaiserCraft bird nest, and the words from the Beauty Quote Stamp.

Here's the same image in greyscale:


Again, coloured with Copic markers (Toner Greys) and put on a black background with the new Scratches Texture Stamp stamped in white.

The rest of the new release can be seen on the Darkroom Door website, and stay tuned as the design team brings you some amazing projects on the blog over the next couple of weeks.

Thanks for dropping in!

Wednesday, 18 June 2014

Copic Ink Backgrounds

Boo! I've made a set of bright cards using Copic Ink refills:


Pop over to the Copic Oz blog to see close ups and a short little video made by moi.

Thanks for looking!

Wednesday, 11 June 2014

Sticky Barc Cards

So excited to have my first post as an X-press Graph-X design team member go live on the Xpress It blog! I had a play with Sticky Barc (awesome product!), and I have a couple of cards to share:


I was delighted to find it cuts like butter with Spellbindes dies! Have a look at the detail it picks up in the feather dies:


I coloured the Sticky Barc with Copics and Distress Ink. I love this product and I look forward to incorporating it into more of my work.

Pop over and see more details about these cards on the Xpress It blog. Thanks for dropping in!


Saturday, 5 April 2014

No Mixed Signals - Steampunk snail

Howdy folks!

Here's a card I made using a cool image I found at Susana's Custom Art and Card Design:


He comes from a set called No Mixed Signals that's available in digital or rubber format. Here are the links below:
Digital
Rubber (for US customers)
Rubber from the Quixotic Paperie (for all other customers).

I used Copic markers to colour the image, and then sponged some Pumice Stone Distress Ink over the whole image to age it a little. The papers are scraps from my scrap box, and the cogs were cut with my Tim Holtz gadget Gears die. The sentiment was made with Echo Park alpha stickers.

Thanks for stopping by!

Thursday, 30 January 2014

Aaaah....flowers

These were the cards we made in the first Copics Project class of the year I ran at Little Bits last week. Instead of stamping, we used black outline stickers for our images and coloured them with Copics:


The gorgeous shiny thick lines of the stickers made colouring a breeze. After colouring, we traced around a Spellbinders Curved matting Basics die, allowing some of the leaves or petals to overhang.

We cut our images out and placed them on the new Darkroom Door Grid Background:


The sentiments come from the Simple Sayings and Whimsical Words sets, also from Darkroom Door. I think you'll agree - the results were some very striking cards!

Thanks for dropping in today!

Monday, 23 December 2013

Christmas Easel Card with Spellbinders dies and Copics

Told you I'm loving the easel card lately!  Here's another one:


The mistletoe heart has had some Plexi glue applied, and then glitter sprinkled on top. Once dry the glitter has then been coloured with Copic markers. Love the sparkle IRL!

The full materials list can be found on the Down Under Direct Inspiration blog.

Thanks for looking!


Monday, 9 September 2013

Copics class - clothing

I run monthly Copic colouring classes at Little Bits. Our last class was about colouring clothing, and we found this cute Little Darlings image to practice our denim on:


We didn't focus on hair and skin too much, so her hair is a little rougher than usual. I teamed the image with KaiserCrafts newish Tea Party range of papers. Love these colours! We cut the image out with some Spellbinders dies.

Thanks for stopping by today!

Thursday, 30 May 2013

A copics class

I run Copic project classes at Little Bits every now and again. It's a chance for people to either learn new skills, or hone old skills, and make something using Copic markers.

This is what we made last month:

 
The theme for the month was ethnic hair and skin, so I thought a fantastic way to keep a sample and description of each colour combination would be to put them in a little folder (that we stamped to look like a passport). The sample book can be added to, and each card can be pulled out for convenience.
 
Next month, the theme will be flowers - looking forward to that one!


Wednesday, 29 August 2012

A Copic class with animals

Ha ha ha ha ha - I just read back the title of this post. I don't mean the people who took my class were in any way unruly! I meant to say we coloured animals LOL.

After colouring in a little doggie, and then a teddy bear, we got stuck into some sealife. The stamps are from Kaisercraft, and we tucked them into the folds of a tent card:


We had absolute Copic beginners mixed with people who have been using Copics for years, and I was equally impressed with everyone's work. I especially love that the beginners were shaking their heads at the start of the class saying "there's no way we can do that!" Yes you can, and you did!!

The next class is titled "Colouring black"and I can't wait to see the results!

Monday, 27 February 2012

Nestabilities butterfly shrinkie

Loving butterflies at the moment. I remember being fascinated by them as a kid - is it just me, or are there less of them nowadays?


I'm also having a little love affair with kraft and orange ;)

The butterfly was cut out with one of the dies in the Wonderful Wings Nestabilities set.  I used the same die to cut a shape from shrink plastic, stamped it with the scrolls, punched a hole to hang it from, and shrunk it. I got a little nervous heating the shrinkie plastic with my heat gun - the butterfly wings started curling in on themselves, but then I channeled my friend Lynne "Just keep heating, it'll be alright."  And it was alright! Here's a close up:


Once the butterfly was shrunk, I coloured it with a Copic marker, and used the same colour to highlight some of the words in the text.

All of the materials I used are listed on the DownUnder Direct Inspiration Blog.

Thanks for stopping by today.


Tuesday, 14 February 2012

Angel Marci Copic Project Class

Here's the card we made at the last Copic Project Class I taught at Little Bits:


We looked at techniques to colour something (in this La-La Land image, the dress and wings) white. Less is definitely more! It's easy to end up with a grey-looking dress. Here's a close up:


For this sample I used W0, W1 and W2 for the white bits. We also had a play with the Cool Greys, pale blues and pale E colours.

The beautiful sentiment stamp is by Darkroom Door - the String Sentiments set, stamped with Versa magic ink in Pink Petunia.

We made our samples into an easel card, which I can now enter into the La-La Land February Easel Card challenge .

Thanks for dropping in today!


Wednesday, 8 February 2012

MFT fairy card

 I'm finding MFT (My Favorite Things) Pure Innocence stamps perfect for little girl cards. Here's one I made for our great niece/grand niece/our niece's daughter:


 I used the Believe in Magic set, some Kaiser 6x6 patterned paper, Nestabilities and the alpha is by Making Memories. Coloured with Copics of course, and just a touch of Stickles added to her wings, skirt and wand.

Hope you're having a magical day!

Thursday, 12 January 2012

Crafty Secrets Car Classics

These are some cards from a class I taught last year. It was a Stamp of the Month class, and the stamp set we used was Car Classics from Crafty Secrets.

I was a little excited to hold a class with this set because our customers often comment that they are stumped when it comes to making cards for men.

This first card uses paper from October Afternoon, with a little sponged ink and some layering onto black cardstock. We stamped onto cream gloss cardstock with black StazOn ink.


This next card has Graphic 45 papers from a couple of different ranges on it, and some light colouring with Copics to match the King of the Road emblem to the papers:


This next card has paper from Teresa Collins, some sponging with Distress Inks and spritzing with water. Love this technique to really age a piece:


This last card is the more technically difficult card (I like to include one in most classes).  The paper is October Afternoon, and the car was coloured with Copics before being fussy cut.


 We made the car pop through the paper - love how this turned out:


Thanks for looking!


Wednesday, 11 January 2012

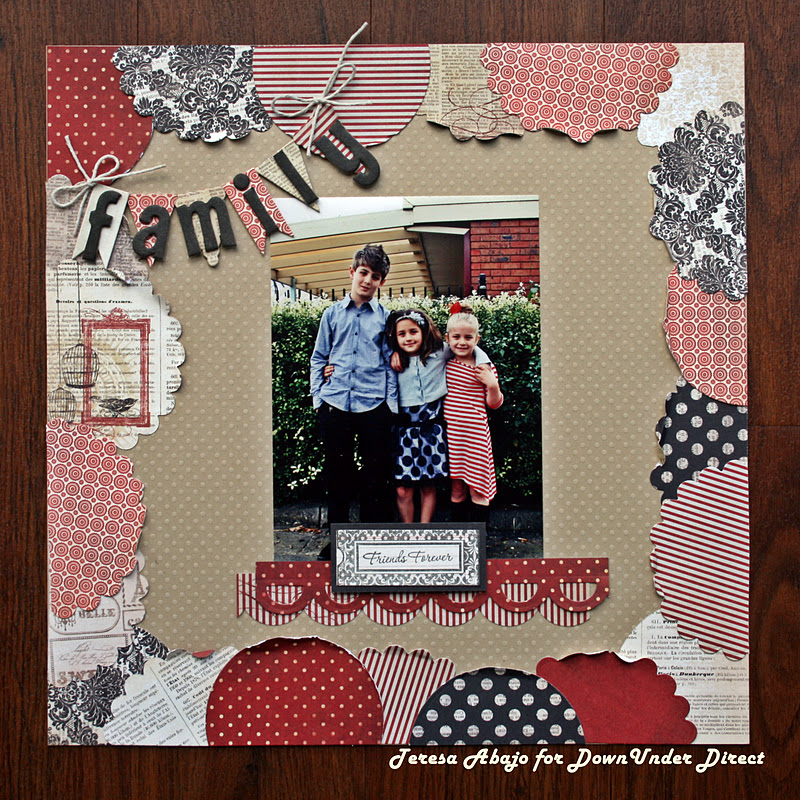
A family layout

This is a layout I did using a photo of my three kids after Rachel's First Communion last year:


A bunch of circles and scalloped circles piled up on top of each other make a nice border for the photo. It also helps that the colours match so well, especially with Elouise's striped dress.

The chipboard alpha was coloured with a W-9 copic marker to match the dark grey/almost black of the papers. The banner was made with the little dies from the Nestabilities Pennants sets.

A full materials list can be found on the DownUnder Direct Inspiration Blog.

Thanks for looking!


Friday, 2 December 2011

Darkroom Door new release

There's nothing more exciting when you're on a creative team and there's a new release of product. Just to know that you're one of the first to get to play with it is awesome!

Darkroom Door has a few new release stamps, and they're being showcased on the blog this week. This is one card I made using the new Star Flowers Photo Stamp:


Yaaay! I got to use my Copics on a Darkroom Door stamp! Love how the leaves turned out:
 

It's a pretty easy image to read - a lot of the shading is already there, so you already know where to make it darker. The details of what I used where are listed in this post on the Darkroom Door blog. I love what Godelieve did with the bicycle, and what Michelle did with the English pub.

Look forward to showing you more new stuff soon.


Wednesday, 30 November 2011

Mimi Copic Project Class

 This is the card we made in the Copics project class I taught last week:


We used a Penny Black Mimi stamp that isn't a dedicated Christmas stamp, so I designed a card that could be used for any occasion if alternative sentiments are used. The paper is one from the new Basic Grey Piccadilly range - gorgeous innit?  Here's a side view (there's more to see inside!):

And here's the inside:


Let me know if you'd like to see the full list of colours we used. I'm never sure how much detail to go into on these posts!

Thanks for dropping in today.


Thursday, 10 November 2011

Christmas layout with Nestabilities

I don't even want to know how close we are to Christmas! Yikes - where has the year gone? I'm moving forward with my eyes shut I tell you!

This is a layout using Nestabilities and JustRite stamps of my three kids. The photo was taken a couple of years ago, and it's still one of my favourites:


Unusual colour combination for Christmas - juneberry, aqua and cream ;) Nothing traditional about that LOL!

The baubles are JustRite stamps, and they have been cut out with Nestabilities Heirloom Ornatment dies. The die the next size up would have left too much of a border, so I have hand cut the juneberry cardstock very carefully.  Here are some close ups:


A bit of stitching and distressing:
 

I didn't have the right coloured alpha to match the layout, so I took to the Thickers with a Copic marker. I ran my sewing machine over the letters - in my experience, they tend to fall off when you least expect it (like when you're ready to take photos of the layout grrrrr...).

The full materials list for this layout can be found on the DownUnder Direct Inspiration blog.

Thanks for dropping in today!