I have a post up on the Inspiration Lane blog showing a couple of pages in my Mixed Media Journal using Bruynzeel watercolour pencils. Here they are through a FabScraps stencil:
and here they are teamed with one of my favourite stamps - Coffee Stain eclectic stamp from Darkroom Door:
Pop on over to the blog to see full pics and step by steps. Thanks for stopping by!
Showing posts with label xpress graphx. Show all posts
Wednesday, 24 September 2014
Thursday, 14 August 2014
Radiant Card Class at Paperific
Here's a sneak of the card class I'll be teaching at Paperific this year from 29-31 August:
We'll be using the gorgeous Radiant range of papers from Authentique - so bright and cheery! We'll also be using Darkroom Door stamps and a bunch of dies and punches from a variety of companies. I must also acknowledge the very generous sponsorship of X-Press Graph-X who will be donating the awesome Foam Tape we will use on all the cards.
There are still some spots left if you're interested in booking in. All bookings can be done through the Paperific website (see class 4 on the list).
I look forward to seeing you there!
We'll be using the gorgeous Radiant range of papers from Authentique - so bright and cheery! We'll also be using Darkroom Door stamps and a bunch of dies and punches from a variety of companies. I must also acknowledge the very generous sponsorship of X-Press Graph-X who will be donating the awesome Foam Tape we will use on all the cards.
There are still some spots left if you're interested in booking in. All bookings can be done through the Paperific website (see class 4 on the list).
I look forward to seeing you there!
Labels:
class,
darkroom door,
xpress graphx
Wednesday, 16 July 2014
Photo pillow with Lumi Inkodye
Look what I made:
That's a photo of my daughters, printed on fabric and made into a cushion. And it was easy!
I made it using Lumi Inkodye products - it's fabric paint that reacts with sunlight.
Pop over to the Inspiration Lane blog to find out how I did it.
That's a photo of my daughters, printed on fabric and made into a cushion. And it was easy!
I made it using Lumi Inkodye products - it's fabric paint that reacts with sunlight.
Pop over to the Inspiration Lane blog to find out how I did it.
Labels:
off the page,
tutorial,
xpress graphx
Wednesday, 9 July 2014
X-Press Graph-X Blog Hop
Yaaaay - it’s time for a blog hop! Everyone on the design team has been working hard to create some really fun projects using some of our favourite products and the best part is that you have OVER TEN opportunities to win!
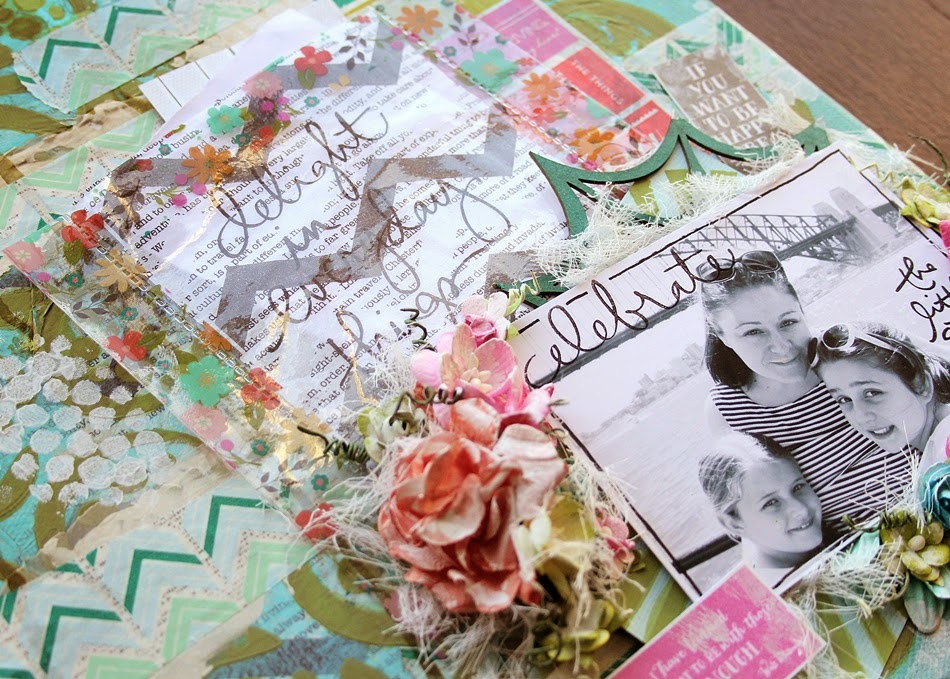
Here's the canvas I put together:
Our brief was to create something that represents you. One of my most treasured roles is mother to three humans, and I love this photo of me and my girls on the Manly ferry last year. I wanted to create something eclectic and colourful to reflect how crazy my life can get, as well as to remember to celebrate the small things this life brings me.
Here's how the canvas came together. I started with a layer of Hazel & Ruby Chevron Newsprint Tissue, stuck on with Tripletac. I left wrinkles in it on purpose to help add texture to the background:
Then I painted the edges of the canvas with turquoise acrylic paint, and mixed some green acrylic paint into a blob of Chromacryl Texture Paste, and applied it to the canvas through a stencil:
Then it got really messy, and I forgot to take proper photos LOL! I love that when I'm creating - when I get lost in the moment and experiment.
I tore some of the first layer of tissue off and added some Chromacryl Gesso over these areas. I toned the colours down a bit with a wash made with brown acrylic paint and water, and then added drips of Crushed Olive Distress Stain. A few strips of Crazy for Chevy and Colourblock Quotes washi tape were added, and the background was almost complete.
I sponged some gesso through a stencil to add the dots. Here's a bit where I put down the word happy using Hazel & Ruby Stencil-Mask:
and here's a Hazel & Ruby Pic Pocket, where I can add some handwritten notes from my girls:
The canvas was completed with some random flowers, cotton gauze and stamps from Technique Tuesday. I also added the frame to the photo with a Molotow pen, and a chipboard spider web painted green from FabScraps supports the photo and flowers.
Now, here's where you come in. We want to know what inspires you! Leave a comment on this post and you could win an awesome bundle of goodies like this one:
Make sure you hop over to the other blogs and the Inspiration Lane Facebook page where you could win a heap of prizes, valued at over $500!! The hop is open from 9am AEST July 9 until 11:59PM Monday July 14, 2014. Sorry, Australian and New Zealand residents only.
The next stop on the blog hop is Sharmaine, and if you want to start from the beginning, pop over to the Inspiration Lane blog.
Happy hopping!
Labels:
bloghop,
off the page,
xpress graphx
Tuesday, 8 July 2014
Blog Hop starts tomorrow!
Lots of excitement building over the X-Press Graph-X blog hop that starts 9am tomorrow. Here's a little sneak of my project:
and here's a look at the prize you could win by leaving a comment on the Inspiration Lane Facebook Page:
It's going to be huuuuge! See you all bright and early (well, 9am anyway) tomorrow!
and here's a look at the prize you could win by leaving a comment on the Inspiration Lane Facebook Page:
It's going to be huuuuge! See you all bright and early (well, 9am anyway) tomorrow!
Labels:
bloghop,
xpress graphx
Wednesday, 18 June 2014
Copic Ink Backgrounds
Boo! I've made a set of bright cards using Copic Ink refills:
Pop over to the Copic Oz blog to see close ups and a short little video made by moi.
Thanks for looking!
Pop over to the Copic Oz blog to see close ups and a short little video made by moi.
Thanks for looking!
Labels:
backgrounds,
cards,
Copics,
darkroom door,
xpress graphx
Friday, 30 May 2014
Faux tile technique with Spellbinders dies
There's a tutorial up on the Down Under Direct Inspiration blog to show you how I came up with this background:
Using a Spellbinders die and embossing folder, and coating it all in X-press Graph-X Triple-Tac adhesive. (I will admit, at this point, I deliberated about changing the title of this post to Faux Tile Tac-nique......yup.....you're welcome).
This is the card I made using the background:
Pop on over to the blog to see it all stepped out. Thanks for coming!
Using a Spellbinders die and embossing folder, and coating it all in X-press Graph-X Triple-Tac adhesive. (I will admit, at this point, I deliberated about changing the title of this post to Faux Tile Tac-nique......yup.....you're welcome).
This is the card I made using the background:
Pop on over to the blog to see it all stepped out. Thanks for coming!
Labels:
cards,
down under direct,
Spellbinders,
tutorial,
xpress graphx
Subscribe to:
Posts (Atom)