Showing posts with label Gel Press. Show all posts

Tuesday, 6 December 2016

Gel Press® Gift Card Tags

I made a set of tags that hold gift cards - just what I need at this time of year for people who already have everything:


There's even a short video on YouTube for you to watch!

Thanks for stopping by!

Thursday, 24 November 2016

Gel Press® Christmas Card Set


I made a set of Christmas cards as part of our November Video Frenzy:


You can see the video on the Gel Press You Tube channel, where you can find awesome videos from the rest of the creative team.

Thanks for dropping in today!

Monday, 14 November 2016

Gel Press® Thanks Tag

I made this thank you tag using a Gel Press® plate, some Deco Art paint and stencil and Tim Holtz patterned paper:


All the details are up on the Gel Press® blog. Thanks for looking!


Sunday, 13 November 2016

Gel Press® Elephant card video tutorial

I have a video tutorial up on You Tube showing how I made this card using a Stencil Girl stencil, Darkroom Door and Carabelle Studio stamps:


Pop over here and take a look!


Saturday, 29 October 2016

Gel Press® and Stencil Girl Video Frenzy

The Gel Press® team have prepared a plethora of videos of projects we made using Stencil Girl stencils for you to watch on our You Tube channel. We're calling it the Gel Press and Stencil Girl Frenzy.

Here's my project:


It's a bunch of cards I made with messages of encouragement for people affected by breast cancer. You can find my video here.

Thanks for looking, and I hope you enjoy all the videos!

Tuesday, 25 October 2016

Shabby Chic Cards with Gel Press®


Hello hello!

I have a set of cards I made using Gel Press in a shabby chic style to show you:


All the details including a tutorial are up on the Gel Press blog.

Thanks for looking!

Friday, 30 September 2016

The Art of Well Being


For our blog hop this month, the team at Gel Press® are indulging in a little introspection and asking how art helps maintain or improve our well being.

For me, the main attraction of art besides the colour and sense of accomplishment is the social aspect. It's a way for me to connect and interact with like-minded people in a safe, nurturing environment.

I feel fortunate to teach classes at my local craft shop. This gives me ample opportunity to interact with crafty people when they come along to learn a new technique or about a new product. I also get a huge sense of accomplishment when I finish planning the class, and then an added bonus at the end when I finish delivering the class and I see happy smiling people who are proud of their efforts.

This is an art journal page I taught recently:


We created a few sheets of fabulous arty paper with a Gel Press® gelatin plate, then die cut them with the teacup die. Elements of the designs were outlined with white gel pen, which really helped unify the very different papers. The alphabet stamps are by Darkroom Door.

 I loved that everyone's teacups all looked so wonderfully diverse, even though we all started with the same tools and materials.


One of the ladies had also booked her daughter in, and as she happens to be one of my daughter's classmates, it gave me an opportunity to include my daughter as well. Here is her design (that she chose to pop on a canvas to hang on a wall):


I love how art brings people together. It binds people across generations and great distances. It keeps me sane and functional.

To find about how art helps the well being of the other members of the design team, hop along and read following the list here:

Teresa < you are here now


Friday, 26 August 2016

Back to Basics with Gel Press®


We're heading back to basics with this Gel Press® blog hop. I had a look around the house to see what I could use to create patterns and textures with my plate.
 
Starting with my 8 x 10 Gel Press plate, some black paint and a brayer:

  
The results of my experiments are wonderfully interesting! I decided to use black paint so that the effects would show up well on white paper. I spread black paint onto the Gel Press® plate, pressed the item onto the plate and pulled the print. Here we go:

Here's what bubble wrap looks like:


And giant bubble wrap:


I went into the garden and found a nice Cycad leaf. It's relatively flat and quite sturdy:


Then I pressed the end of a cardboard roll into the paint to create a pattern of interlocking circles:


Next I found some hard plastic packaging:


And some softer plastic packaging (from some delicious donuts):


Then I found some thick sturdy Christmas trim. I pressed it onto the paint on the plate, pulled a print, then removed the trim and pulled another print:


And here is some thick twine. The print on the left is the result of pulling a print with the twine in place, and the print on the right is the ghost print when the twine was removed (it reminds me of pictures I've seen of Ebola virus!):


Lastly I scrunched up a plastic shopping bag and pressed it repeatedly into the paint on the plate:


I had myself quite a collection of black and white prints in just a short time.  They're fine to use as they are, but I went ahead and pulled out my colour sprays. Once these dry, I will use them as backgrounds for cards and perhaps even some art journaling:


Thanks for looking! I hope you've enjoyed my ideas. The design team has some awesome back to basic ideas for you to check out. Here's the list:


Teresa
 

Thanks again for dropping in today!

Wednesday, 17 August 2016

Gel Press® Butterfly Cards


Howdy!

I have a post up on the Gel Press® blog showing how I made these cards:


I used some bright Lindy's Stamp Gang embossing powders over some gel prints, then cut them out with a KaiserCraft die. The sentiments are from Darkroom Door stamp sets.

Pop over to the Gel Press® blog to see the tutorial.

Hope you're having a wonderful crafty day!


Thursday, 30 June 2016

Fabric Heart Decorations with Gel Press®


I used my Gel Press® plate to create these little fabric heart decorations:


I will use these to decorate gifts I plan to give in the coming weeks. They'll look fabulous tied onto a gift bag made from kraft paper!  Here's how I made them:

Step 1
I used my 8 x 10 Gel Press® gel printing plate, calico fabric and acrylic paint from DecoArt. I don't plan to ever wash these, so fabric medium is not necessary.


Step2
Apply acrylic paint to gel printing plate. I created a unique design using string and thread:


Step3
Once the fabric was printed and dried well,  I folded each strip in half and drew heart shapes on the back. I didn't use a template as I wanted each heart to be unique.


Step4
I then stuck a pin through both layers of fabric and cut each heart shape out. Then I turned the shapes over and repinned them. I even cut little heart shapes from the left over bits of fabric - these will be used in a future project.


Step 5
At this stage, I decided the shapes needed a little more detail, so I stamped some images on them using black and plum ink. I used a sewing machine to stitch the matching shapes together, and stuffed them with hobby fill before stitching them closed.


I added some twill and a fabric flower so that they're ready to use as a gift tag decoration:


Thanks for looking.

You can find loads more ideas on what to make with your Gel Press® gel printing plates on the Facebook group: Gel Press™ Junkies, and YouTube channel.


Thursday, 2 June 2016

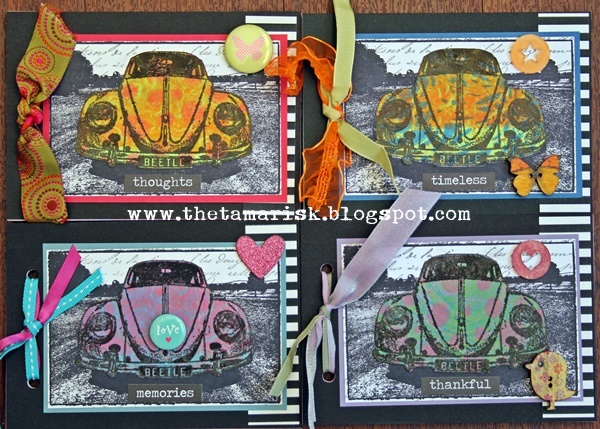
Beetle Notebooks with Gel Press™ and a giveaway

I made a stack of these little books using a Gel Press™ plate, DecoArt paints and a Darkroom Door Photo Stamp called "Beetle":

 
I made a little video of part of the process, and you can see it here, or click the link and watch it on YouTube:


Watch the video and let me know what you think! Then come back here and tell me which notebook you like the best and I'll pick a couple of names out of a hat this Sunday 5th June. I'll then post a couple of notebooks out to the lucky winners! Each book has a different word on it, so it's easy to let me know which one you'd like.


Here they are close up:


Thanks for stopping by and watching my video! Good luck for the giveaway!


Thursday, 26 May 2016

Male Card with Gel Press™


Welcome to our "Just For Him" blog hop with Gel Press™!  

Please take time to hop through all the great blogs of our designers for inspiration, and leave a comment or two as you go.  Go back to the Gel Press™ blog and leave a comment telling us which blog gave you the most inspiration!  We will draw a random winner from the comments to win a prize from Gel Press™!!!

Here's my project, a masculine good luck card:

 
and here's how I used my 8 x 10" Gel Press™ Gel Plate to make the background:


Step 1
Gather supplies: Gel Plate, brayer, acrylic paint (Golden Quin Nickel Azo Gold, Mars Black), a page from an old dictionary, white tissue paper and a couple of stencils.


Step 2
Brayer a thin layer of Quin Nickel Azo Gold onto the gel plate, then apply a stencil with large holes. Pull a print on some scrap paper, then remove the stencil and quickly pull a print onto the dictionary page.

 The dictionary page will have large spaces with no paint:

Step 3
Apply a layer of black paint to the gel plate using a brayer, lay over this a stencil with small holes (eg cracks), lay the dictionary page over this and pull the print.


Step 4
Apply a layer of adhesive (I have used XPress-GraphX TripleTac, but you can used Matte Medium, PVA or Gel Medium), then apply tissue paper. Smooth out the tissue paper to minimise but not completely eradicate wrinkles.

Step 5
While smoothing out the tissue paper, some of it may tear. Fret not - this only adds to the vintage effect:

Once dry, this background is ready to use on a card. 

Now, here's the hop list for you to visit:


Don't forget to leave a comment or two as you go, then on the Gel Press™ blog at the end! Good luck!


Want a bonus chance to win a prize from Gel Press™?  Between now and Father's Day (June 19, 2016) create your own "Just For Him" project and post it on our Facebook page Gel Press Junkies!  Everyone that plays along will be entered in a drawing as well.  Yes, we would love you to use a Gel Press™ in your entry- but you don't have to! Just make a fabulous project featuring Fathers Day and post it!  Maybe you will win a Gel Press™! 
To qualify for the drawing: 
1) You may enter a maximum of 3 times with individual projects.
2) You must be 18 years old.
3) You must live in the USA.
4) Mentioning other products or other companies in your post disqualifies your project.