The Darkroom Door Creative Team had a discussion about how to cut this set up - whether to cut the sheet into individual inchies (which would make it really hard to stamp them in a straight row), or whether to cut the sheet into various combinations (eg 3x3, 1x4 etc). I decided to leave my sheet whole, and do the cutting after the image is stamped, that way I can get a background stamped in one go. The whole mounted sheet fits back neatly into its tin, so storage of such a big unmounted stamp isn't a problem.
We made 5 cards in the class. Here's the first:
We first stamped and embossed the Garden Inchies with white embossing powder. We then smooched some Distress Inks onto a Craft Sheet, spritzed with water, and swiped our stamped image and another piece of cardstock to make that awesome background. We stamped the fern leaf from the Leaves set, and stuck the 5 inchies down the right hand side of the card.
Here's a close up of the inchies:
The next card featured just the one inchie:
A high concentration of colour, achieved with Copic markers. The inchie was mounted onto some chipboard for height, and the edges coloured black. The centre window was cut with a Nestabilities die, and the script comes from the Correspondence set. Here's a side shot:
The next card is simply layers of squares - so simple and so effective. The smaller squares were cut with punches, and the larger ones with Nestabilities dies, all in a soothing monochromatic green:
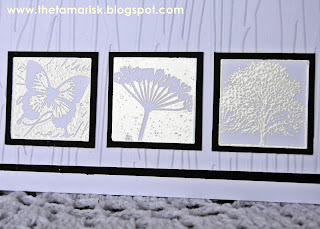
I wanted to do a simple black and white card, again the inchies were embossed with white embossing powder, and mounted onto some slightly larger black squares. The background was embossed with a Cuttlebug embossing folder, and some gingham ribbon was added to the top corner with a white brad:
Here's a close up of the inchies:
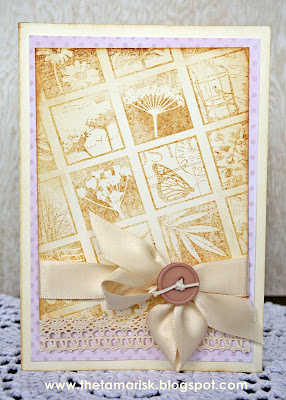
We used the entire stamp as a background for this last card. Stamped with Saddle Brown StazOn, and the edges of the piece were sponged with Tea Dye Distress Ink. This card can be customised with a sentiment at a later stage is desired. I'm loving the lavender and rust colour scheme!
Thanks for sitting through this loooong post! Hope you've got some ideas for using the Garden Inchie set - it's really quite versatile.


Gorgeous cards Teresa!!!!!
ReplyDeleteBeautiful cards Teresa, so looking forward to next Friday!
ReplyDeleteI love the diversity of looks that you achieved. Fantastic!
ReplyDeleteBeautiful cards Teresa. I'd pick the butterfly one. Gorgeous.
ReplyDeleteBeautiful cards, all of them!!!
ReplyDeleteGorgeous cards Teresa! I love the versatility of the inchies, each card is so different!
ReplyDeleteGorgeous work - just wow!
ReplyDelete